Introduction
When working in the Cloud, the first thing to know is that automation is key, and I’ve found no better tool than Ansible to help me with that. It is flexible, and yet very easy to use and learn. I love it.
I’ve been using AWS for a long time now and, as many other people using EC2 instances, I’ve set up a lot of Virtual Private Clouds (or VPCs).
For those who are not familiar with VPCs, here is a small description from AWS :
Amazon Virtual Private Cloud (Amazon VPC) lets you provision a logically isolated section of the Amazon Web Services (AWS) cloud where you can launch AWS resources in a virtual network that you define. You have complete control over your virtual networking environment, including selection of your own IP address range, creation of subnets, and configuration of route tables and network gateways.
You can easily customize the network configuration for your Amazon Virtual Private Cloud. For example, you can create a public-facing subnet for your webservers that has access to the Internet, and place your backend systems such as databases or application servers in a private-facing subnet with no Internet access. You can leverage multiple layers of security, including security groups and network access control lists, to help control access to Amazon EC2 instances in each subnet.
Using a VPC when working with EC2 instances is vital. It is so important that Amazon Cloud Services actually made it mandatory for any new EC2 instance. You can either use the default one provided by AWS with every account, or create your owns to suit your needs.
In this post we will focus on using Ansible to create a VPC from scratch. I will present 3 different topologies :
- VPC with Public subnet only
- VPC with Public/Private subnets
- VPC with Public/Private subnets and Multi Availability Zones
(Hint : the last topology is the best.)
All of the Ansible playbooks I will use are available on my Github page. If you are not familiar with the way Ansible works, you can have a look at its documentation.
Prerequisites
- Ansible :
sudo pip install ansible - Boto :
sudo pip install boto - AWS CLI :
sudo pip install awscli
Let’s get started
First, let’s have a look at what the structure of the playbook will look like :
├── playbook.yml
├── inventory
├── vars.yml
├── roles/
│   ├── vpc/
│   │   ├── tasks/
│   │   │   ├── main.yml
This folder structure will look very familiar to Ansible users. it will be the same for all of the VPC topologies I present here. Only the content of roles/vpc/tasks/main.yml will change depending on the VPC definition.
The main file of the playbook, playbook.yml, is very easy to set up : we just define a list of roles we want to apply to a group of hosts. Here we will only have one role : vpc.
---

- hosts: local
  roles:
    - vpc
The group of hosts which will run the playbook is defined in the inventory file. In this case, we run the playbook locally, therefore the file looks like this :
[local]
localhost ansible_connection=local
Finally, all the variables we use in the playbook are listed in the vars.yml file :
You will need to replace the AWS credential variables. Feel free to change the AWS Region.
Note : The my_ip variable is used to configure the Security Group (or SG) that the playbook will add to the VPC. That SG will allow incoming SSH access from this IP only to any EC2 instance attached with this group. Security Groups are very flexible and can therefore be modified later.
Now, we will focus on the heart of the playbook : the tasks. As I mentioned before, in this example all the tasks are located in roles/vpc/tasks/main.yml. Depending on the VPC topology, the tasks will be different.
Let’s start with the simpler one.
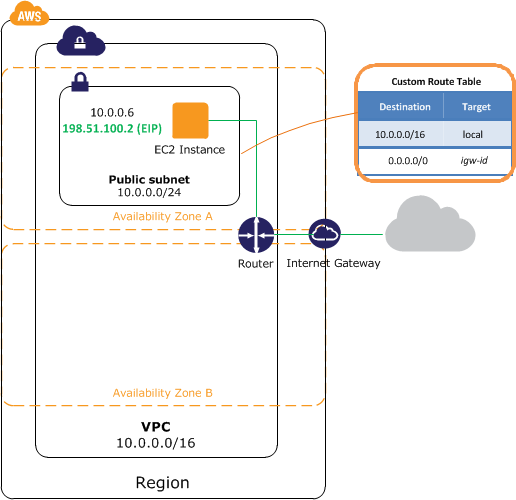
Part 1 : VPC with Public subnet
This VPC will only contain one subnet, that we will call Public Subnet. All the instances located in that subnet will have both a private IP address and a public IP address. The public address will represent them when reaching the outside of the VPC. A Subnet is located in an Availability Zone (or AZ). Since we only have one subnet, all of the future EC2 resources in this VPC will be launched in that AZ.
Here is how this topology looks like :
For this set of tasks we will use different Ansible modules created specifically for AWS. Go have a look at the documentation, there is a lot of them.
For creating this VPC topology, the roles/vpc/tasks/main.yml file should look like this :
Run the playbook :
ansible-playbook playbook.yml -i inventory -e @vars.yml
And that’s it! Now we have a working VPC we can use to launch instances. Don’t forget to add a public IP address to the EC2 machines you will start in that VPC, and attach the Security Group to them, so that you can connect via SSH.
This kind of VPC is great for development and testing purposes, but not a good choice for production systems. You don’t want your critical resources to sit in a public subnet. Those resources need to be protected, and only reachable from within the VPC. This is where our second VPC topology comes into play.
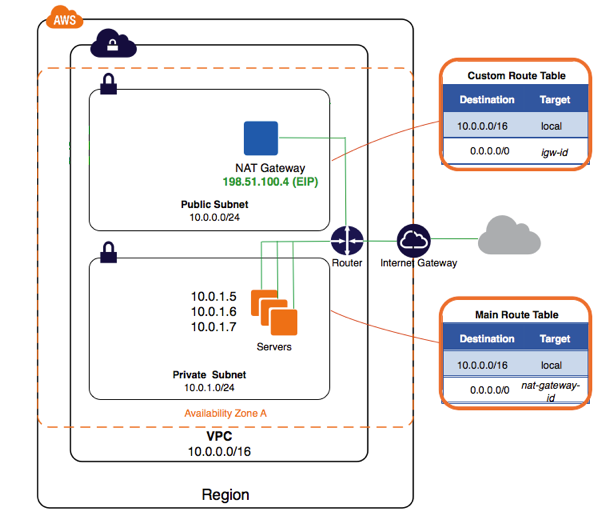
Part 2 : VPC with Public/Private subnets
With this new topology, we are approaching the needs we would have for a production system. We will create a VPC with a public subnet, and also a private one. The later will host critical resources for your application(s), such as database servers, web servers, etc… Some of those critical resources might need a connection to the internet. Since they are located in a private subnet, they won’t have a public IP. In order to give them access to the outside world, we will have to use a NAT system.
There are several ways to do NAT on AWS. Until recently, the usual way was to create a small EC2 instance in the public subnet, with a public IP address, and use it as a NAT instance. This is still the case for many AWS users, and it is actually a cheap way to do NAT. However, in late 2015, AWS created a new service, called NAT Gateway. The name speaks for itself : it is basically a NAT-as-a-Service for VPCs. We just need to create it, attach it to our VPC, attach a public IP address and that’s pretty much it. Not only we don’t have to maintain an EC2 instance, but the service also guaranties high availability within the AZ.
Note : I chose to use NAT Gateways for this tutorial, but feel free to use an EC2 instance instead. There are plenty of great tutorials online to follow. NAT Gateways will probably cost a bit more than EC2 NAT instances. But for a production system, I would recommend using NAT Gateways, as it means less maintenance.
Another note : In this example you will have to use the AWS CLI for certain tasks. This is simply because some steps are not possible with Ansible modules … yet. They will probably soon be. In the meantime, AWS CLI it is! You can install it with pip : sudo pip install awscli.
For creating this VPC topology, here is how roles/vpc/tasks/main.yml should look like :
Run the playbook :
ansible-playbook playbook.yml -i inventory -e @vars.yml
We now have a VPC with a private subnet where we can run our production systems. Any EC2 instance created in that subnet will have access to the outside world via the NAT Gateway. However, these instances won’t be directly accessible from the outside world.
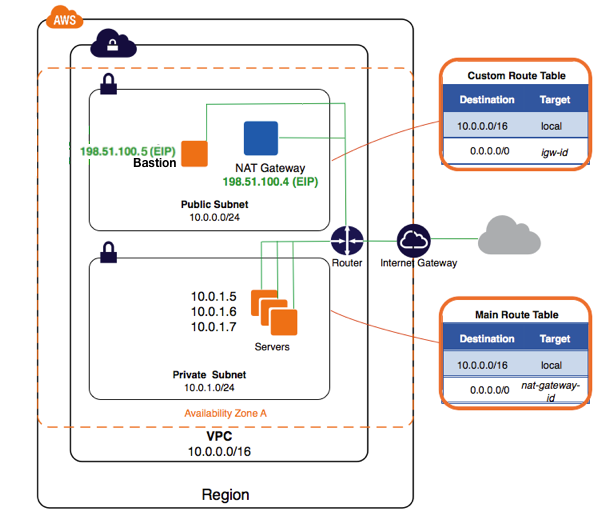
Note : How to reach these instances from the outside ? It depends on your needs. If you want to SSH to an instance located in a private subnet, you will have to create an EC2 machine in your public subnet, and SSH to that one first. Then, from that machine (usually called a bastion), you can SSH to your private instance. This use case fits perfectly with the security groups we just created : “Private Instances SG” accepts SSH connections from instances attached with “External SSH Access SG”. Another example : if one of your private instance is a web server, you might want it to be accessible from the outside world. The best way here is to create an Elastic Load Balancer in AWS, and attach your web server to it.
This topology is nice and effective, but there’s one more thing missing : availability. For now, our VPC is located in one availability zone only. It means all resources in that VPC will be in the same physical Datacenter, using the same power supply. Therefore, if that AZ fails (we know it happened in the past), we could lose everything, at least temporarily. That means … downtime. Ugh. Not acceptable for any production system. This is why your production VPC needs to be Multi-AZ.
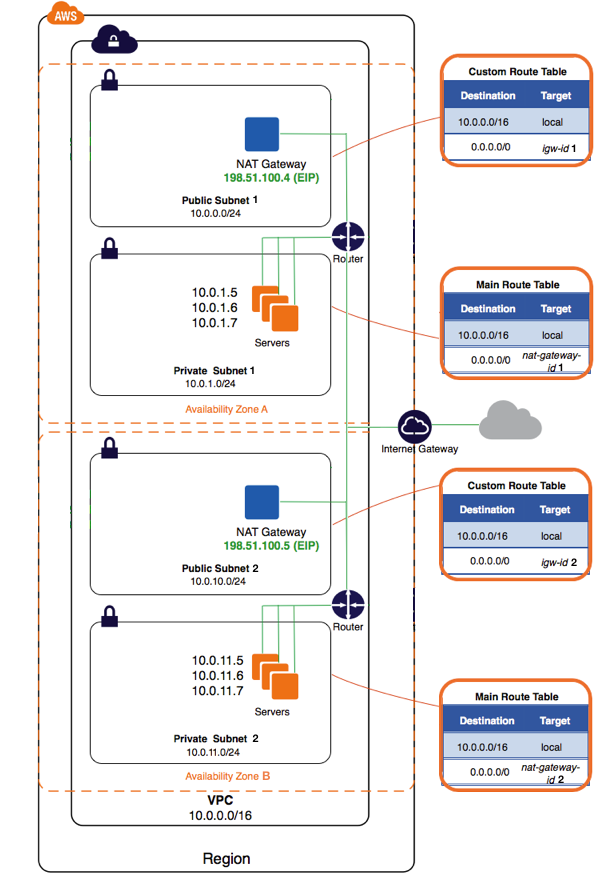
Part 3 : VPC with Public/Private subnets and Multi Availability Zones
This is the final part of this post. As I said at the very beginning, this topology is the one I recommend, especially if you want to use this VPC for production.
In this example, we are going to create a VPC with two Availability Zones. In an AWS region, Availability Zones are physically separated, and their power supply are different, so that in the case of a power outage, not all zones are impacted. Pretty awesome.
The topology is very similar to the previous one, except that almost everything is doubled. We will create 4 subnets (2 publics, 2 privates). We will create 2 Elastic IPs, and 2 NAT Gateways (one per AZ). We double the NAT Gateways so that each AZ can be completely independent.
For creating this VPC topology, the roles/vpc/tasks/main.yml file should look like this :
Run the playbook :
ansible-playbook playbook.yml -i inventory -e @vars.yml
With this topology now created, you are ready to deploy highly available applications to your Virtual Private Cloud on AWS.
Conclusion
This use case is the perfect example of why automation is key when working with Cloud resources. Now that this script is done, creating another VPC will only take seconds. I hope this article will help you to decide which topology is best for your use case, and to learn how to use Ansible to create it from scratch. Feel free to ask any question in the comments below.